
Hello, Guys!
I’ve created this project to teach you “Earthquake Detector Alarm using Arduino”.
- Uses:
- Detecting Earthquake
- Knock-and-shake detector for ATMs
- Door-break alarm
- vehicle anti-theft alarm
- Components Required:
- Arduino (UNO, Mini etc)
- Accelerometer ADXL335
- 16×2 LCD
- Buzzer
- BC547 transistor
- 1k Resistors
- 10K POT
- LED
- Power Supply 9v/12v
- Jumper cables
- Official Arduino Software for coding (Arduino IDE )
- Laptop/Desktop (For coding purpose only)
Note: An earthquake is an unpredictable natural disaster that causes damage to lives and property. It happens suddenly and we cannot stop it but we can be alerted from it. In today’s time, there are many technologies which can be used to detect the small shakes and knocks, so that we can take precautions prior to some major vibrations in the earth. Here we are using Accelerometer ADXL335 to detect the pre-earthquake vibrations. Accelerometer ADXL335 is highly sensitive to shakes and vibrations along with all the three axes. Here we are building an Arduino based Earthquake Detector using Accelerometer.
- How to make it:
Accelerometer:
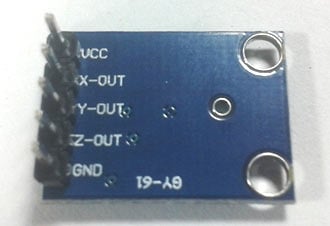
Pin Description of accelerometer:
- Vcc 5 volt supply should connect at this pin.
- X-OUT This pin gives an Analog output in x direction
- Y-OUT This pin gives an Analog Output in y direction
- Z-OUT This pin gives an Analog Output in z direction
- GND Ground
- ST This pin used for set sensitivity of sensor
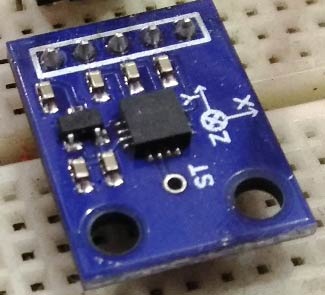
 Highly-sensitive ADXL335
We know that accelerometers like ADXL335 are highly sensitive to knocks and vibrations in any of the three physical axes. ADXL335 gives analog voltage equivalent to imposed acceleration. It has three outputs, one each for of X-, Y- and Z-axes. The three analog outputs are wired to Arduino Uno ADC pins. Any acceleration caused due to movement in any of the axes is detected by the accelerometer and hence by Arduino ADC.
If the motion is violent enough during an earthquake and crosses a certain threshold, a local alarm light (LED) glows, a buzzer sound, as well as a relay, energizes. While the buzzer and light are for the home purpose, relay output is for industrial purpose; it can be wired to a PLC for safety interlocking of any moving machine part and furnace control for shutting these down in case of an earthquake. The threshold adjustment buttons are there for carrying out this task. An LCD has been provided for viewing threshold adjustments and for making the system user-friendly.
Circuit and working:
The circuit uses Arduino Uno board wired to ADXL335 accelerometer module (connected across CON2) with its ADC inputs, namely, X-axis to A0, Y-axis to A1 and Z-axis to A2. Two push buttons through the supply of 5V are wired to Arduino Uno interrupt pins 2 and 3 that are pulled down to ground via resistors R2 and R1. These buttons are used for incrementing and decrementing the threshold of vibration detection. A 16×2 LCD (LCD1) is wired in a 4-wire mode with Arduino pins contrast control and backlight enabled.

image credits: E Forum

Code:
#include <EEPROM.h>
#include “EEPROMAnything.h”
#include <LiquidCrystal.h>
const int alarmPin = 5;
const int relayPin = 10;
int Xacc, Yacc, Zacc, threshold = 0, thresholdSET = 25;
long debouncing_time = 15; //Debouncing Time in Milliseconds
volatile unsigned long last_micros;
LiquidCrystal lcd(12, 11, 9, 8, 7, 6);
struct sensorValue
{
int X;
int Y;
int Z;
};
sensorValue acceleration;
void debounceInterrupt_Increment()
{
if ((long)(micros() – last_micros) >= debouncing_time * 1000) {
IncrementThreshold();
last_micros = micros();
}
}
void debounceInterrupt_Decrement()
{
if ((long)(micros() – last_micros) >= debouncing_time * 1000) {
DecrementThreshold();
last_micros = micros();
}
}
void IncrementThreshold() {
thresholdSET = EEPROM.read(500);
thresholdSET++;
EEPROM.write(500, thresholdSET);
}
void DecrementThreshold() {
thresholdSET = EEPROM.read(500);
thresholdSET–;
EEPROM.write(500, thresholdSET);
}
void setup() {
lcd.begin(16, 2);
attachInterrupt(0, debounceInterrupt_Increment, RISING);
attachInterrupt(1, debounceInterrupt_Decrement, RISING);
pinMode(alarmPin, OUTPUT);
pinMode(relayPin, OUTPUT);
digitalWrite(relayPin, HIGH);
EEPROM.write(500, thresholdSET);
digitalWrite(alarmPin, LOW);
lcd.setCursor(0, 0);
lcd.print(“Initializing….”);
delay(5000);
sensorValue acceleration = { analogRead(A0) , analogRead(A1) , analogRead(A2) };
EEPROM_writeAnything(0, acceleration);
EEPROM_readAnything(0, acceleration);
lcd.clear();
}
void loop() {
EEPROM_readAnything(0, acceleration);
threshold = EEPROM.read(500);
lcd.setCursor(0, 0);
lcd.print(“Monitoring Mode”);
lcd.setCursor(0,1);
lcd.print(“Threshold = “);
lcd.print(threshold);
Xacc = analogRead(A0);
Yacc = analogRead(A1);
Zacc = analogRead(A2);
if ((Xacc >= (acceleration.X + threshold)) || (Xacc <= (acceleration.X – threshold))||(Yacc >= (acceleration.Y + threshold)) || (Yacc <= (acceleration.Y – threshold))||(Zacc >= (acceleration.Z + threshold)) || (Zacc <= (acceleration.Z – threshold))) {
digitalWrite(relayPin, LOW);
digitalWrite(alarmPin, HIGH);
lcd.clear();
lcd.setCursor(0, 0);
lcd.print(“ALARM !!!!!”);
lcd.setCursor(0,1);
lcd.print(“PLEASE EVACUATE”);
delay(5000);
digitalWrite(relayPin, HIGH);
digitalWrite(alarmPin, LOW);
lcd.clear();
}
}
